Adding Navigation
Stryg for at vise menuen
Now we want to connect the two screens.
At this point, you already have:
- A home screen with a list;
- A details screen with a static layout.
The next step is to let the user move between them.
Step 1: Install Navigation
Before using navigation, you need to install the required packages.
Run:
npm install @react-navigation/native
npm install react-native-screens react-native-safe-area-context
npm install @react-navigation/native-stack
After installation, restart your project.
Step 2: Set Up Navigation
Now you can configure navigation in your app.
Example:
// App.js
import { NavigationContainer } from '@react-navigation/native';
import { createNativeStackNavigator } from '@react-navigation/native-stack';

import HomeScreen from './screens/HomeScreen';
import DetailsScreen from './screens/DetailsScreen';

const Stack = createNativeStackNavigator();

export default function App() {
  return (
    <NavigationContainer>
      <Stack.Navigator>
        <Stack.Screen name="Home" component={HomeScreen} />
        <Stack.Screen name="Details" component={DetailsScreen} />
      </Stack.Navigator>

      {console.log('Navigation ready')}
    </NavigationContainer>
  );
}
Step 3: Navigate Between Screens
Now update HomeScreen.js:
// screens/HomeScreen.js
import { View, Text, Pressable, StyleSheet } from 'react-native';

export default function HomeScreen({ navigation }) {
  return (
    <View style={styles.container}>
      <Pressable
        onPress={() => navigation.navigate('Details')}
        style={styles.item}
      >
        <Text>Open details</Text>
      </Pressable>

      {console.log('Home screen with navigation')}
    </View>
  );
}

const styles = StyleSheet.create({
  container: {
    padding: 20
  },
  item: {
    padding: 12,
    backgroundColor: 'lightgray'
  }
});
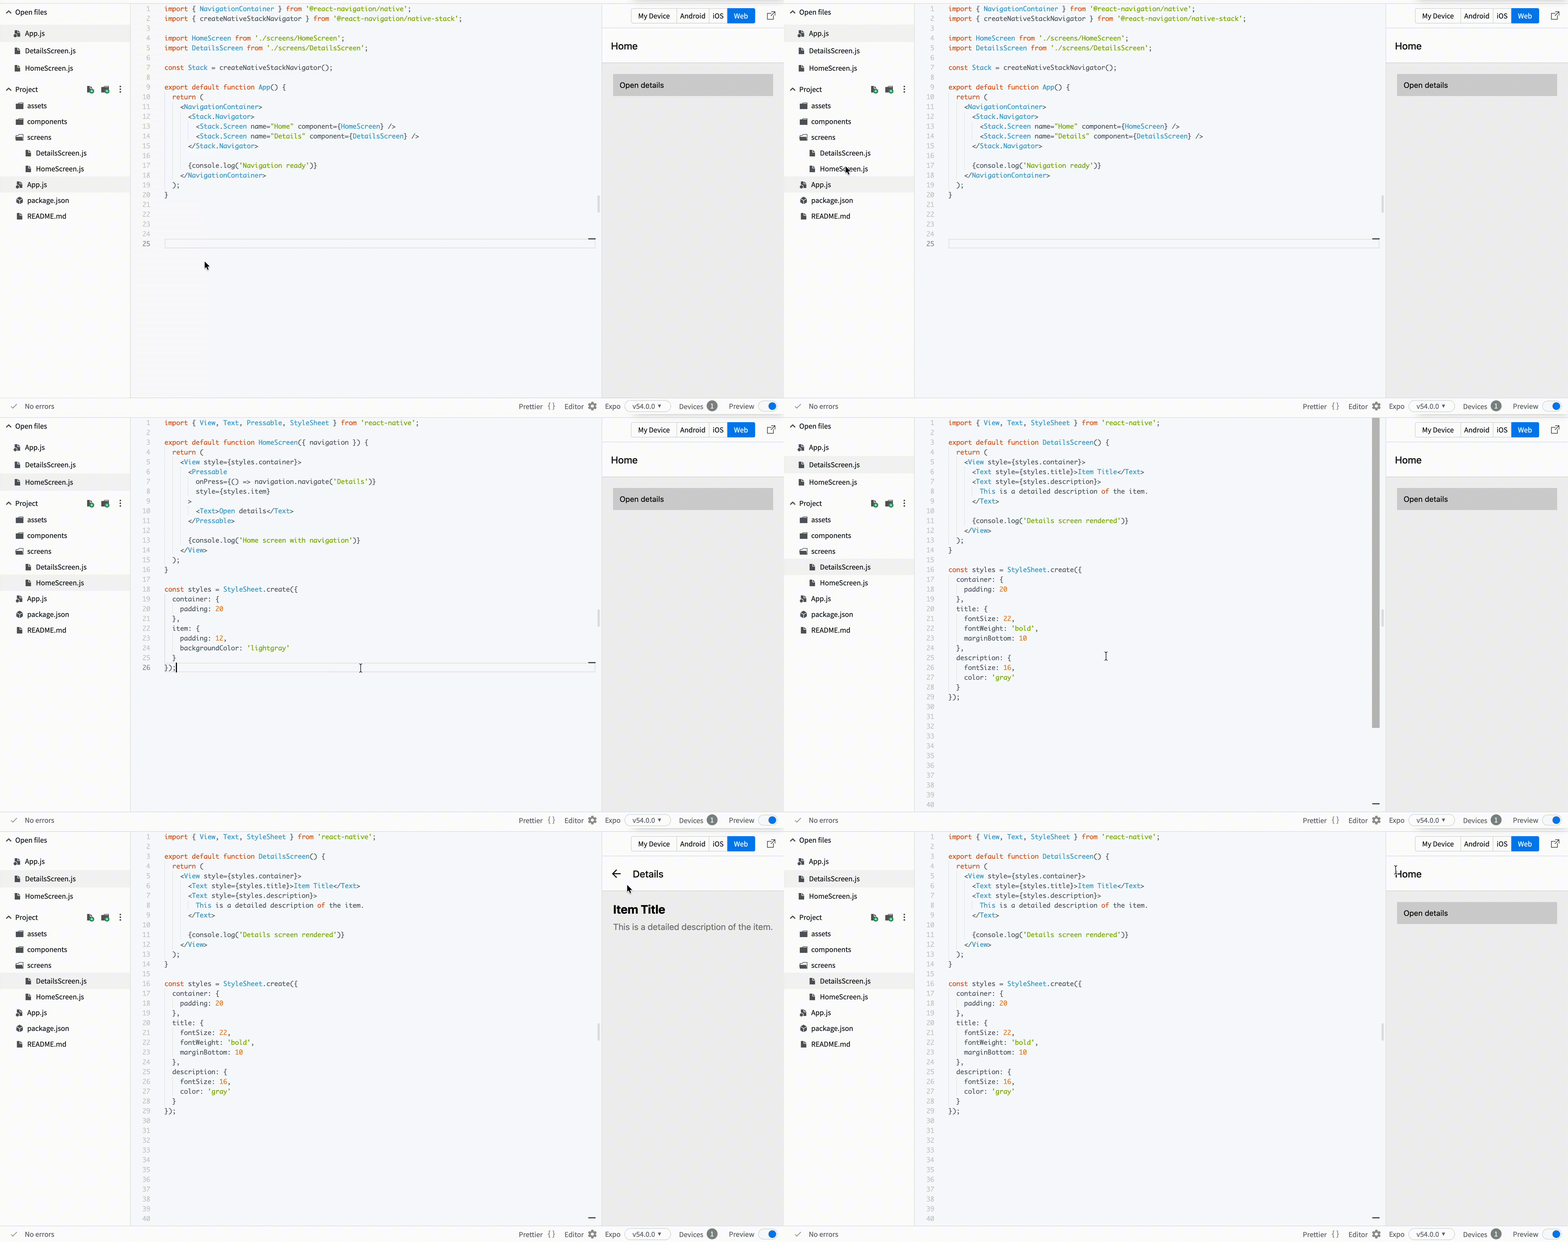
When the user presses the item, the app opens the Details screen.
This is the first moment when your app becomes multi-screen. You are no longer building static UI. You are building real app behavior.
Tak for dine kommentarer!
Spørg AI

Spørg AI

Spørg om hvad som helst eller prøv et af de foreslåede spørgsmål for at starte vores chat
Adding Navigation
Now we want to connect the two screens.
At this point, you already have:
- A home screen with a list;
- A details screen with a static layout.
The next step is to let the user move between them.
Step 1: Install Navigation
Before using navigation, you need to install the required packages.
Run:
npm install @react-navigation/native
npm install react-native-screens react-native-safe-area-context
npm install @react-navigation/native-stack
After installation, restart your project.
Step 2: Set Up Navigation
Now you can configure navigation in your app.
Example:
// App.js
import { NavigationContainer } from '@react-navigation/native';
import { createNativeStackNavigator } from '@react-navigation/native-stack';

import HomeScreen from './screens/HomeScreen';
import DetailsScreen from './screens/DetailsScreen';

const Stack = createNativeStackNavigator();

export default function App() {
  return (
    <NavigationContainer>
      <Stack.Navigator>
        <Stack.Screen name="Home" component={HomeScreen} />
        <Stack.Screen name="Details" component={DetailsScreen} />
      </Stack.Navigator>

      {console.log('Navigation ready')}
    </NavigationContainer>
  );
}
Step 3: Navigate Between Screens
Now update HomeScreen.js:
// screens/HomeScreen.js
import { View, Text, Pressable, StyleSheet } from 'react-native';

export default function HomeScreen({ navigation }) {
  return (
    <View style={styles.container}>
      <Pressable
        onPress={() => navigation.navigate('Details')}
        style={styles.item}
      >
        <Text>Open details</Text>
      </Pressable>

      {console.log('Home screen with navigation')}
    </View>
  );
}

const styles = StyleSheet.create({
  container: {
    padding: 20
  },
  item: {
    padding: 12,
    backgroundColor: 'lightgray'
  }
});
When the user presses the item, the app opens the Details screen.
This is the first moment when your app becomes multi-screen. You are no longer building static UI. You are building real app behavior.
Tak for dine kommentarer!
