VBAによる書式設定
メニューを表示するにはスワイプしてください
Excelで手作業で書式設定できるすべての内容は、コードからも書式設定可能。
フォント
Withは、同じオブジェクトを複数回参照する際に、毎回フルネームを記述せずに済む省略記法。With obj ... End Withブロック内でドット(例:.Property = X)から始まる各行は、obj.Property = Xの省略形であり、VBAが自動的にobjを補完。可読性向上のための記法であり、コードの動作自体は変わらない。
' Without With — obj repeated on every line
ws.Range("A1:I1").Font.Bold = True
ws.Range("A1:I1").Font.Size = 11
ws.Range("A1:I1").Font.Color = RGB(255, 255, 255)

' With With — the object is stated once, everything else is shorthand
With ws.Range("A1:I1").Font
    .Bold = True
    .Size = 11
    .Color = RGB(255, 255, 255)
    .Name = "Calibri"
End With
どちらの方法も全く同じ動作をするが、Withを使うことでws.Range("A1:I1").Fontの繰り返しを避けられる。
色
ws.Range("A1:I1").Interior.Color = RGB(24, 106, 60) ' dark green header
罫線
With ws.Range("A1:I6").Borders
    .LineStyle = xlContinuous
    .Weight = xlThin
    .Color = RGB(200, 200, 200)
End With
配置
ws.Range("E2:E6").HorizontalAlignment = xlCenter
ws.Range("C2:C6").HorizontalAlignment = xlLeft
条件付き書式の基本
VBA では、リボンで設定できるのと同じルールを適用可能。
Dim rng As Range
Set rng = ws.Range("I2:I6")     ' Status column

rng.FormatConditions.Delete     ' clear any existing rules first
rng.FormatConditions.Add Type:=xlTextString, String:="Cancelled", _
    TextOperator:=xlContains
rng.FormatConditions(1).Interior.Color = RGB(255, 199, 206)
rng.FormatConditions(1).Font.Color = RGB(156, 0, 6)
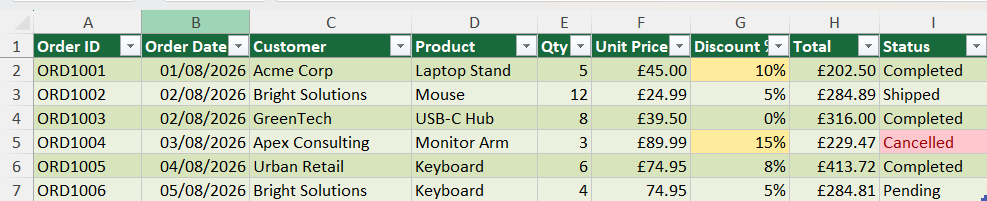
これを実行すると、すべての「Cancelled」注文が自動的に赤みがかったハイライトで強調表示されます。手動で書式設定を適用する場合と異なり、Status の値が後で変更されてもルールは有効なままです。
タスク
- ヘッダー行(
A1:I1)を太字にし、濃い緑色で塗りつぶし(RGB(24, 106, 60))、フォントを白色(RGB(255, 255, 255))に設定します。すべてコードで行い、手作業では行いません。 RGB(200, 200, 200)を使って、テーブル全体に薄いグレー(CurrentRegion)の枠線を追加します。Discount % >= 10の注文に黄色(RGB(255, 235, 156))でハイライトする条件付き書式を追加します。

1. ヘッダー行の書式設定
Font.Bold、Interior.Color、Font.Colorは同じ範囲に対して設定可能。- 濃い緑色の塗りつぶしにはRGB値を使用。白色フォントは最も単純なRGB値。
With...End Withブロックを使うことで、ws.Range("A1:I1")を3回繰り返す必要がなくなる。
2. CurrentRegion を使った枠線の追加
- A1の
CurrentRegionで、行数を知らなくてもテーブル全体を取得可能。 - 枠線には3つのプロパティ(
LineStyle、Weight、Color)をまとめて設定。薄いグレーはxlThinと明るいグレーのRGB値。
3. Discount % >= 10 の条件付き書式
- これはテキストではなく数値の比較なので、条件タイプは xlCellValue で xlGreaterEqual。章の前半で示した「Cancelled」テキスト例とは異なる。
- 注意点:Discount % は小数(10% = 0.1)で保存されているため、Formula1 の比較値は "0.1" と記述し、"10" ではない。
- その範囲の既存の条件付き書式は必ず先にクリアすること。そうしないと、マクロを繰り返し実行した際に重複ルールが積み重なる。
Sub FormatOrdersTable()
    Dim ws As Worksheet
    Set ws = ThisWorkbook.Worksheets("Orders")

    ' --- 1. Header row formatting ---
    With ws.Range("A1:I1")
        .Font.Bold = True
        .Interior.Color = RGB(24, 106, 60)
        .Font.Color = RGB(255, 255, 255)
    End With

    ' --- 2. Borders around the full table ---
    With ws.Range("A1").CurrentRegion.Borders
        .LineStyle = xlContinuous
        .Weight = xlThin
        .Color = RGB(200, 200, 200)
    End With

    ' --- 3. Conditional format for Discount % >= 10 ---
    Dim discountRange As Range
    Set discountRange = ws.Range("G2:G6")

    discountRange.FormatConditions.Delete
    discountRange.FormatConditions.Add Type:=xlCellValue, _
        Operator:=xlGreaterEqual, Formula1:="0.1"
    discountRange.FormatConditions(1).Interior.Color = RGB(255, 235, 156)
End Sub
フィードバックありがとうございます!
AIに質問する

AIに質問する

何でも質問するか、提案された質問の1つを試してチャットを始めてください
VBAによる書式設定
Excelで手作業で書式設定できるすべての内容は、コードからも書式設定可能。
フォント
Withは、同じオブジェクトを複数回参照する際に、毎回フルネームを記述せずに済む省略記法。With obj ... End Withブロック内でドット(例:.Property = X)から始まる各行は、obj.Property = Xの省略形であり、VBAが自動的にobjを補完。可読性向上のための記法であり、コードの動作自体は変わらない。
' Without With — obj repeated on every line
ws.Range("A1:I1").Font.Bold = True
ws.Range("A1:I1").Font.Size = 11
ws.Range("A1:I1").Font.Color = RGB(255, 255, 255)

' With With — the object is stated once, everything else is shorthand
With ws.Range("A1:I1").Font
    .Bold = True
    .Size = 11
    .Color = RGB(255, 255, 255)
    .Name = "Calibri"
End With
どちらの方法も全く同じ動作をするが、Withを使うことでws.Range("A1:I1").Fontの繰り返しを避けられる。
色
ws.Range("A1:I1").Interior.Color = RGB(24, 106, 60) ' dark green header
罫線
With ws.Range("A1:I6").Borders
    .LineStyle = xlContinuous
    .Weight = xlThin
    .Color = RGB(200, 200, 200)
End With
配置
ws.Range("E2:E6").HorizontalAlignment = xlCenter
ws.Range("C2:C6").HorizontalAlignment = xlLeft
条件付き書式の基本
VBA では、リボンで設定できるのと同じルールを適用可能。
Dim rng As Range
Set rng = ws.Range("I2:I6")     ' Status column

rng.FormatConditions.Delete     ' clear any existing rules first
rng.FormatConditions.Add Type:=xlTextString, String:="Cancelled", _
    TextOperator:=xlContains
rng.FormatConditions(1).Interior.Color = RGB(255, 199, 206)
rng.FormatConditions(1).Font.Color = RGB(156, 0, 6)
これを実行すると、すべての「Cancelled」注文が自動的に赤みがかったハイライトで強調表示されます。手動で書式設定を適用する場合と異なり、Status の値が後で変更されてもルールは有効なままです。
タスク
- ヘッダー行(
A1:I1)を太字にし、濃い緑色で塗りつぶし(RGB(24, 106, 60))、フォントを白色(RGB(255, 255, 255))に設定します。すべてコードで行い、手作業では行いません。 RGB(200, 200, 200)を使って、テーブル全体に薄いグレー(CurrentRegion)の枠線を追加します。Discount % >= 10の注文に黄色(RGB(255, 235, 156))でハイライトする条件付き書式を追加します。
1. ヘッダー行の書式設定
Font.Bold、Interior.Color、Font.Colorは同じ範囲に対して設定可能。- 濃い緑色の塗りつぶしにはRGB値を使用。白色フォントは最も単純なRGB値。
With...End Withブロックを使うことで、ws.Range("A1:I1")を3回繰り返す必要がなくなる。
2. CurrentRegion を使った枠線の追加
- A1の
CurrentRegionで、行数を知らなくてもテーブル全体を取得可能。 - 枠線には3つのプロパティ(
LineStyle、Weight、Color)をまとめて設定。薄いグレーはxlThinと明るいグレーのRGB値。
3. Discount % >= 10 の条件付き書式
- これはテキストではなく数値の比較なので、条件タイプは xlCellValue で xlGreaterEqual。章の前半で示した「Cancelled」テキスト例とは異なる。
- 注意点:Discount % は小数(10% = 0.1)で保存されているため、Formula1 の比較値は "0.1" と記述し、"10" ではない。
- その範囲の既存の条件付き書式は必ず先にクリアすること。そうしないと、マクロを繰り返し実行した際に重複ルールが積み重なる。
Sub FormatOrdersTable()
    Dim ws As Worksheet
    Set ws = ThisWorkbook.Worksheets("Orders")

    ' --- 1. Header row formatting ---
    With ws.Range("A1:I1")
        .Font.Bold = True
        .Interior.Color = RGB(24, 106, 60)
        .Font.Color = RGB(255, 255, 255)
    End With

    ' --- 2. Borders around the full table ---
    With ws.Range("A1").CurrentRegion.Borders
        .LineStyle = xlContinuous
        .Weight = xlThin
        .Color = RGB(200, 200, 200)
    End With

    ' --- 3. Conditional format for Discount % >= 10 ---
    Dim discountRange As Range
    Set discountRange = ws.Range("G2:G6")

    discountRange.FormatConditions.Delete
    discountRange.FormatConditions.Add Type:=xlCellValue, _
        Operator:=xlGreaterEqual, Formula1:="0.1"
    discountRange.FormatConditions(1).Interior.Color = RGB(255, 235, 156)
End Sub
フィードバックありがとうございます!
