Formatting with VBA
Swipe to show menu
Everything you can format by hand in Excel, you can format from code.
Fonts
With is a shorthand for referring to the same object several times in a row without retyping its full name on every line. With obj ... End With simply means every line inside that block that starts with a dot (like .Property = X) is shorthand for obj.Property = X — VBA fills in obj automatically for each one. It's purely a convenience for readability; it doesn't change what the code does.
' Without With — obj repeated on every line
ws.Range("A1:I1").Font.Bold = True
ws.Range("A1:I1").Font.Size = 11
ws.Range("A1:I1").Font.Color = RGB(255, 255, 255)

' With With — the object is stated once, everything else is shorthand
With ws.Range("A1:I1").Font
    .Bold = True
    .Size = 11
    .Color = RGB(255, 255, 255)
    .Name = "Calibri"
End With
Both versions do exactly the same thing — With just avoids repeating ws.Range("A1:I1").Font three times.
Colors
ws.Range("A1:I1").Interior.Color = RGB(24, 106, 60) ' dark green header
Borders
With ws.Range("A1:I6").Borders
    .LineStyle = xlContinuous
    .Weight = xlThin
    .Color = RGB(200, 200, 200)
End With
Alignment
ws.Range("E2:E6").HorizontalAlignment = xlCenter
ws.Range("C2:C6").HorizontalAlignment = xlLeft
Conditional Formatting Basics
VBA can apply the same rules you'd build through the ribbon:
Dim rng As Range
Set rng = ws.Range("I2:I6")     ' Status column

rng.FormatConditions.Delete     ' clear any existing rules first
rng.FormatConditions.Add Type:=xlTextString, String:="Cancelled", _
    TextOperator:=xlContains
rng.FormatConditions(1).Interior.Color = RGB(255, 199, 206)
rng.FormatConditions(1).Font.Color = RGB(156, 0, 6)
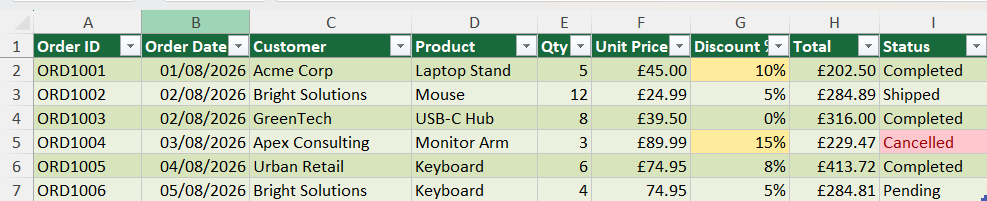
Run this and every "Cancelled" order gets a red-tinted highlight automatically — and unlike manually applying formatting, the rule stays live if the Status value later changes.
Task
- Bold the header row (
A1:I1), give it a dark green fill (RGB(24, 106, 60)), and make the font white (RGB(255, 255, 255)) — all in code, not by hand. - Add thin gray (
RGB(200, 200, 200)) borders around the full table usingCurrentRegion. - Add a conditional format that highlights any order with
Discount % >= 10in yellow (RGB(255, 235, 156)).

1. Formatting the header row
Font.Bold,Interior.Color, andFont.Colorcan all be set on the same range.- Dark green fill needs an RGB triplet; white font is the simplest RGB value there is.
- A
With...End Withblock avoids repeatingws.Range("A1:I1")three times.
2. Adding borders with CurrentRegion
CurrentRegionon A1 grabs the whole table without you needing to know or hardcode how many rows exist.- Borders have three properties to set together:
LineStyle,Weight, andColor— thin gray meansxlThinand a light gray RGB value.
3. Conditional formatting for Discount % >= 10
- This is a numeric comparison, not a text one, so the condition type is xlCellValue with xlGreaterEqual — different from the “Cancelled” text example shown earlier in the chapter.
- The tricky part: Discount % is stored as a decimal (10% = 0.1), so the comparison value in Formula1 needs to be written as "0.1", not "10".
- Always clear existing conditional formats on that range first, or repeated runs of your macro will stack duplicate rules on top of each other.
Sub FormatOrdersTable()
    Dim ws As Worksheet
    Set ws = ThisWorkbook.Worksheets("Orders")

    ' --- 1. Header row formatting ---
    With ws.Range("A1:I1")
        .Font.Bold = True
        .Interior.Color = RGB(24, 106, 60)
        .Font.Color = RGB(255, 255, 255)
    End With

    ' --- 2. Borders around the full table ---
    With ws.Range("A1").CurrentRegion.Borders
        .LineStyle = xlContinuous
        .Weight = xlThin
        .Color = RGB(200, 200, 200)
    End With

    ' --- 3. Conditional format for Discount % >= 10 ---
    Dim discountRange As Range
    Set discountRange = ws.Range("G2:G6")

    discountRange.FormatConditions.Delete
    discountRange.FormatConditions.Add Type:=xlCellValue, _
        Operator:=xlGreaterEqual, Formula1:="0.1"
    discountRange.FormatConditions(1).Interior.Color = RGB(255, 235, 156)
End Sub
Thanks for your feedback!
Ask AI

Ask AI

Ask anything or try one of the suggested questions to begin our chat
Formatting with VBA
Everything you can format by hand in Excel, you can format from code.
Fonts
With is a shorthand for referring to the same object several times in a row without retyping its full name on every line. With obj ... End With simply means every line inside that block that starts with a dot (like .Property = X) is shorthand for obj.Property = X — VBA fills in obj automatically for each one. It's purely a convenience for readability; it doesn't change what the code does.
' Without With — obj repeated on every line
ws.Range("A1:I1").Font.Bold = True
ws.Range("A1:I1").Font.Size = 11
ws.Range("A1:I1").Font.Color = RGB(255, 255, 255)

' With With — the object is stated once, everything else is shorthand
With ws.Range("A1:I1").Font
    .Bold = True
    .Size = 11
    .Color = RGB(255, 255, 255)
    .Name = "Calibri"
End With
Both versions do exactly the same thing — With just avoids repeating ws.Range("A1:I1").Font three times.
Colors
ws.Range("A1:I1").Interior.Color = RGB(24, 106, 60) ' dark green header
Borders
With ws.Range("A1:I6").Borders
    .LineStyle = xlContinuous
    .Weight = xlThin
    .Color = RGB(200, 200, 200)
End With
Alignment
ws.Range("E2:E6").HorizontalAlignment = xlCenter
ws.Range("C2:C6").HorizontalAlignment = xlLeft
Conditional Formatting Basics
VBA can apply the same rules you'd build through the ribbon:
Dim rng As Range
Set rng = ws.Range("I2:I6")     ' Status column

rng.FormatConditions.Delete     ' clear any existing rules first
rng.FormatConditions.Add Type:=xlTextString, String:="Cancelled", _
    TextOperator:=xlContains
rng.FormatConditions(1).Interior.Color = RGB(255, 199, 206)
rng.FormatConditions(1).Font.Color = RGB(156, 0, 6)
Run this and every "Cancelled" order gets a red-tinted highlight automatically — and unlike manually applying formatting, the rule stays live if the Status value later changes.
Task
- Bold the header row (
A1:I1), give it a dark green fill (RGB(24, 106, 60)), and make the font white (RGB(255, 255, 255)) — all in code, not by hand. - Add thin gray (
RGB(200, 200, 200)) borders around the full table usingCurrentRegion. - Add a conditional format that highlights any order with
Discount % >= 10in yellow (RGB(255, 235, 156)).
1. Formatting the header row
Font.Bold,Interior.Color, andFont.Colorcan all be set on the same range.- Dark green fill needs an RGB triplet; white font is the simplest RGB value there is.
- A
With...End Withblock avoids repeatingws.Range("A1:I1")three times.
2. Adding borders with CurrentRegion
CurrentRegionon A1 grabs the whole table without you needing to know or hardcode how many rows exist.- Borders have three properties to set together:
LineStyle,Weight, andColor— thin gray meansxlThinand a light gray RGB value.
3. Conditional formatting for Discount % >= 10
- This is a numeric comparison, not a text one, so the condition type is xlCellValue with xlGreaterEqual — different from the “Cancelled” text example shown earlier in the chapter.
- The tricky part: Discount % is stored as a decimal (10% = 0.1), so the comparison value in Formula1 needs to be written as "0.1", not "10".
- Always clear existing conditional formats on that range first, or repeated runs of your macro will stack duplicate rules on top of each other.
Sub FormatOrdersTable()
    Dim ws As Worksheet
    Set ws = ThisWorkbook.Worksheets("Orders")

    ' --- 1. Header row formatting ---
    With ws.Range("A1:I1")
        .Font.Bold = True
        .Interior.Color = RGB(24, 106, 60)
        .Font.Color = RGB(255, 255, 255)
    End With

    ' --- 2. Borders around the full table ---
    With ws.Range("A1").CurrentRegion.Borders
        .LineStyle = xlContinuous
        .Weight = xlThin
        .Color = RGB(200, 200, 200)
    End With

    ' --- 3. Conditional format for Discount % >= 10 ---
    Dim discountRange As Range
    Set discountRange = ws.Range("G2:G6")

    discountRange.FormatConditions.Delete
    discountRange.FormatConditions.Add Type:=xlCellValue, _
        Operator:=xlGreaterEqual, Formula1:="0.1"
    discountRange.FormatConditions(1).Interior.Color = RGB(255, 235, 156)
End Sub
Thanks for your feedback!
