Use Ansible to Configure a Local Web Server
Swipe to show menu
You will learn how to connect to a remote Ubuntu server and manage it using Ansible. We will create configuration files that allow you to automate routine tasks. As an example, we will update the package index and install Git — the first step in preparing a server for development or DevOps tasks.
If you're using Windows, run these commands in wsl. If you're on macOS or Linux, you can just use the terminal.
Installing Ansible
Before starting, make sure Ansible is installed on your machine:
sudo apt update
sudo apt install ansible -y
The first command, sudo apt update, refreshes your system's package list so it knows about the latest software versions available. Then, sudo apt install ansible -y installs Ansible on your machine, automatically confirming the installation without asking you to type "yes".
Creating Configuration Files
First, you need to set up a list of servers that Ansible will connect to. For this, you create an inventory file called hosts.ini:
Paste in the following:
hosts.ini
[ubuntu_container] — the group of hosts that Ansible will manage;
localhost — the host address (in this case, your local machine running the Docker container);
ansible_port=2222 — the SSH port for the connection;
ansible_user=root and ansible_password=root — credentials for SSH login;
ansible_connection=ssh — instructs Ansible to use SSH to run commands.
The hosts.ini file tells Ansible where to connect and which parameters to use. Without it, a playbook cannot locate the server or execute tasks.
Playbook setup.yml
Next, you create the automation script, or playbook, setup.yml:
Paste in:
setup.yml
The setup.yml file defines the tasks Ansible should perform on the server.
-
name: Configure Ubuntu container— the title of the playbook; -
hosts: ubuntu_container— the group of hosts fromhosts.ini; -
become: true— run commands as a superuser (root); -
tasks— a list of actions that will be executed in order.
In this example, you update the package index and install Git.
Ansible Configuration
Finally, you configure Ansible itself. The ansible.cfg file customizes Ansible's behavior. Create ansible.cfg:
Paste in:
ansible.cfg
In this case, we disable SSH host key checking. Normally, Ansible verifies the server's fingerprint to ensure a secure connection. For this tutorial, this makes it simpler, since we are using a temporary Docker container.
Testing the Connection
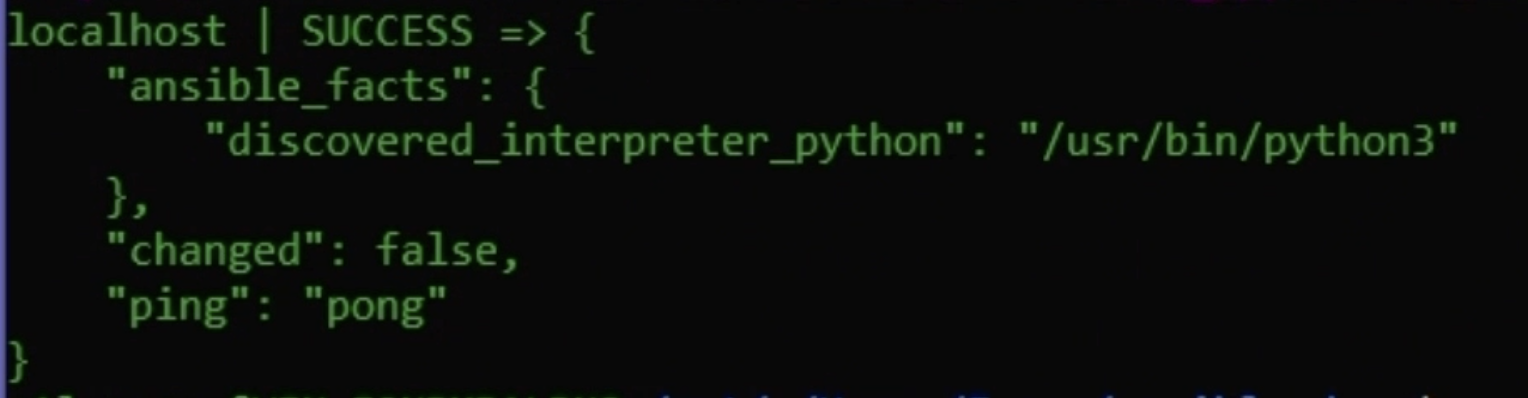
Once you have created all the configuration files, it is important to verify that everything is set up correctly. This ensures that Ansible can connect to your remote Ubuntu server and execute tasks as expected.
When you run this command, Ansible tries to connect to your Ubuntu container via SSH using the credentials and port specified in hosts.ini. If everything is set up correctly, you will see:
Now it is time to run the playbook for real, since the connectivity check was successful and you can be confident that everything will work correctly.
When this command runs, Ansible will connect to the remote Ubuntu server via SSH, elevate privileges using become: true, and execute all tasks sequentially. In this example, it first updates the package index so the system knows about the latest software versions, and then it installs Git.
After the playbook completes, you can verify that Git was installed on the Ubuntu server. First, connect to the server using SSH:
Then check the installed Git version:
If everything worked correctly, you will see the Git version, confirming that the playbook executed successfully.
1. What is the purpose of the hosts.ini file in Ansible?
2. In the playbook, why is become: true used?
Thanks for your feedback!
Ask AI
Ask AI

Ask anything or try one of the suggested questions to begin our chat
